Need some help ?

Faq
After a successful OBD relearn, that TPMS light turns on again after customer has driven a while…
After triggering 4 OE or aftermarket sensors, I connect the OBDII module into the ECU, and nothing happens.
Please check all points above before proceeding.
After triggering 4 OE or aftermarket sensors, I connect the OBDII module into the ECU. The message TRANSFER FAILURE appears on the screen.
ATEQ VT15 tools purchased before 1/1/2011
ATEQ VT15 tools purchased before January 1st, 2011 will need to be updated in order to have compatibility with the WebVT software. Please follow the following steps in order download this update, if necessary:
Auto relearn procedure
An auto relearn procedure is when a vehicle has the ability to learn single or multiple TPMS sensor IDs without the need of performing the relearn procedure with a TPMS tool. Furthermore, a technician can adjust the inflation pressure, rotate or replace sensors and the TPMS system will reset itself after the vehicle has been driven for a period of time. However, before servicing the tires/wheels, it is always recommended to use a TPMS tool to trigger each of the vehicle’s sensors to make sure they are working properly.
For example, a 2008 Dodge Charger requires the following auto relearn procedure:
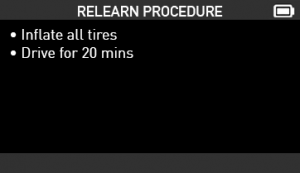
Image of VT56 screen displaying auto relearn procedure for 2008 Dodge Charger
Direct vs. Indirect TPMS systems
There are two types of TPMS systems: direct TPMS and indirect TPMS. Direct TPMS systems use TPMS sensors inside the wheel to accurately report pressure data to the vehicle’s ECU in real time. Direct systems include Asian, Domestic and European vehicles. An indirect TPMS system uses an ABS system to monitor the speed of the wheel in order to approximate tire pressure. Indirect systems include Asian and some European vehicles.
Facts about tire pressure
General recommendations for ATEQ TPMS tool programming issues
How do I update my ATEQ TPMS tool?
If this is the first time you are trying to update your tool, start here.
If this is not the first time you have updated your tool, start here
How to check if the USB connection works correctly (VT56, VT55)


How to check the SD card works correctly
For the VT56, check the SD card icon on the upper right corner next to the battery status. If there is a red “X” through your SD card icon, it is faulty, please contact tech support for further instructions.


How to program an aftermarket TPMS sensor
Replace an old sensor by creating a new sensor ID using a blank aftermarket programmable sensor. Before servicing tires, trigger the vehicle’s sensors by Make, Model, Year selection or VIN scan. (VIN scan option available in North America only.) Triggering the vehicle’s sensors will allow you to identify damaged or defective sensors. If your tool fails to display the sensor information after trying to trigger the sensor, you will need to create a new sensor by selecting the vehicle’s Make, Model, Year or by sensor model.
Watch the video below to learn how to program an aftermarket TPMS sensor with the VT56. The same instructions apply for all other TPMS tools that are able to program sensors.
There are two ways to program a blank sensor with the ATEQ VT56.
Option 1, select by sensor manufacturer.
– From the main menu, select program then select the programmable sensor model you are working with. (Note, ATEQ TPMS tools program ALL major aftermarket programmable sensor brands.)
– Next, select the vehicle’s Make, Model, Year.
– Select CREATE, press OK to create new sensor information.
– Position the sensor in front of the tool’s antenna.
– The sensor has been successfully programmed.
Option 2, select by vehicle Make, Model, Year.
– From the main menu, select program, then select the vehicle’s Make, Model, Year.
– Next, select the programmable sensor model you are working with. (Note, ATEQ TPMS tools program ALL major aftermarket programmable sensor brands.)
– Select CREATE, press OK to create new sensor information.
– Position the sensor in front of the tool’s antenna.
– The sensor has been successfully programmed.
How to set up Wi-Fi for VT56 (BETA)
The Wi-Fi functionality is available on ATEQ VT56 tools and Continental VDO TPMS Pro. Transfer job data to WebVT PC Desktop wirelessly.
The Wi-Fi functionality is in BETA. The user is solely responsible for any damage, loss of network or data resulting from use of the functionality.
Downloadable instructions will be available soon
I cannot find the vehicle in the database
ATEQ covers 99% of all passenger vehicles. If you find a vehicle equipped with a TPMS system and it is not shown in tool, please don’t hesitate to contact ATEQ.
I cannot update the tool.
Before contacting support, please try the following troubleshooting options.
If the vehicle is a commercial vehicle, it may not be in the database.
IMPORTANT: For any OBD issue please check the following first.


My PC cannot locate my device
When WebVT displays “Searching device” or “Device not found” as an error message, you may need to re-install the USB drivers. Reasons for this error include:
Download the USB drivers for your device. For the VT56, VT55, VT36, VT30, VT15, Mitsureset and Quickset, please download the following file: WebVT
OBDII relearn procedure
An OBDII relearn procedure requires a TPMS diagnostic tool to transfer new sensor IDs directly to the vehicle’s ECU. The user will need to trigger each TPMS sensor, connect to the vehicle’s OBD port, then follow the step-by-step instructions on the tool. The new TPMS sensor IDs are then transferred to the vehicle. Most Asian and specialty European vehicles require OBD relearn.
For example, a 2011 Toyota Camry requires the following OBDII relearn procedure:
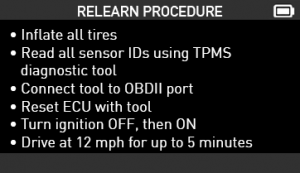
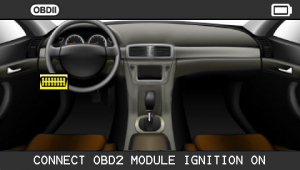
Image of VT56 screen displaying auto relearn procedure for 2011 Toyota Camry
Manual and stationary relearn systems can sometimes take several steps to relearn the TPMS system. TPMS diagnostic tools have the step-by-step instructions for auto, stationary and OBD relearn, however, the steps involved can be long and complicated. OBD relearn procedures are becoming standard in a shop environment for many reasons. First and foremost, it is the easier to work with since the same procedure can be performed no matter what the vehicle type is. Secondly, OBD relearn saves time and confusion for the technician since there are less steps to perform. According to amra.org, 62% of vehicles require a TPMS diagnostic tool and 27% require OBD functionality. It is important to have a reliable TPMS diagnostic tool with excellent OBD coverage to keep up with the growing industry of TPMS.
Did you know? ATEQ has the largest OBD coverage (86% and growing) to help shop owners save time and money!
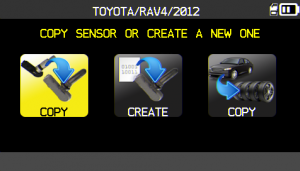
OE, universal, configurable and programmable TPMS sensors
Vehicles with direct-type TPMS systems are equipped with TPMS sensors. If a TPMS sensor is not working, it must be replaced before a relearn procedure can be performed. The damaged TPMS sensor can be replaced by an OE sensor or an aftermarket sensor.
There are different types of aftermarket TPMS sensors including universal, configurable and programmable sensors. OE sensors, universal and configurable sensors have new sensor ID’s already encoded within the sensor and need to be activated by using a TPMS diagnostic tool. Programmable TPMS sensors require a TPMS diagnostic tool to create new sensor ID’s or transfer sensor ID’s from the old sensor.
For multi-brand repair shops, a mix of universal sensors and OE sensors is often required. Our tools support the largest aftermarket sensor list on the market including, Alligator sens.it, BWD Standard OE and Standard QWIK, Continental REDI-Sensor, Dorman Direct Fit, Hamaton U-Pro, HUF IntelliSens, MOBILETRON, NAPA QWIK and OE Design, Orange Simple Sensor, Schrader EZ-sensor, SMP Standard OE and Standard QWIK and STEELMAN Select.
Some important features of the ATEQ VT56 and VT36 when working with TPMS sensors include:
Stationary relearn procedure
A stationary relearn procedure allows new TPMS sensor IDs to be transferred to the vehicle’s ECU without driving a vehicle. This type of relearn procedure requires a TPMS activation tool to trigger the sensors when the vehicle is in learn mode either by using a TPMS diagnostic tool or a diagnostic scan tool. The vehicle then uses a radio frequency (RF) signal to communicate with the vehicle’s ECU to establish which sensor is in which specific location.
For example, a 2014 Ford Escape (with standard ignition) requires the following stationary relearn procedure:
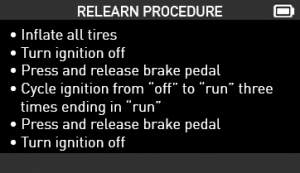
Image of VT56 screen displaying auto relearn procedure for 2014 Ford Escape (with standard ignition)
Steps to reset TPMS system
The proper steps to reset a TPMS system for a vehicle with direct-TPMS:
The proper steps to reset a TPMS system for a vehicle with indirect TPMS:
The displayed pressure is incorrect.
Possible cause: the protocol used is incorrect. Contact ATEQ.
TPMS relearn procedures
When service has been performed to the vehicle’s direct TPMS system, such as air pressure adjustment, tire rotation or replacement of sensors, vehicles require a TPMS system relearn to be performed. A relearn allows the vehicle’s ECU to see the ID’s of each sensor in each wheel. Completing the relearn procedure clears TPMS diagnostic fault codes and allows the vehicle’s TPMS system to function properly.
Relearn procedures vary by manufacturer, so a technician must know which proper relearn procedure is necessary to put the vehicle in learn mode. Although relearn procedures differ from manufacturer to manufacturer, the three types of relearn procedures for direct TPMS systems are auto relearn, stationary and OBD. Furthermore, some vehicles may use a combination of two or more relearn types. Indirect TPMS systems use an initialization procedure which may require a TPMS tool to figure out the steps involved to reset the system.
The chart below represents the three types of TPMS relearn procedures within the market of Asian, Domestic and European vehicles equipped with direct TPMS systems.
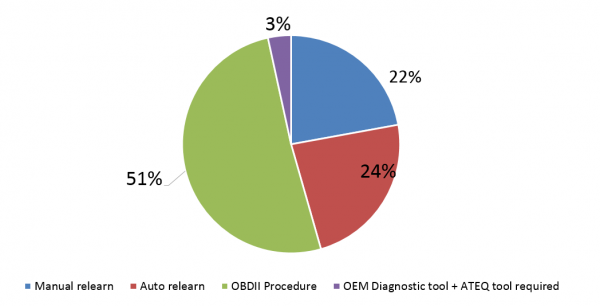
Information from this chart was obtained from the ATEQ European database system
VT56 printer: how to check the printer works correctly
WebVT cannot find my device
When WebVT displays “Searching device” or “Device not found” as an error message, you may need to re-install the USB drivers. Reasons for this error include:
Please complete the following steps to correct the issue.
1. Download the USB drivers for your device. For the VT56, VT55, VT36, VT30, VT15, Mitsureset and Quickset, please download the following file: WebVT
What does a TPMS activation tool actually trigger?
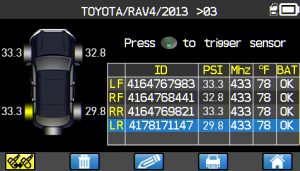
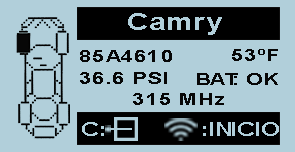
Users “trigger” or “decode” the TPMS sensor within the wheel. This TPMS sensor is not physically reachable since it is mounted inside the tire. Therefore, decoding or triggering a sensor must be done wirelessly using a TPMS triggering tool.
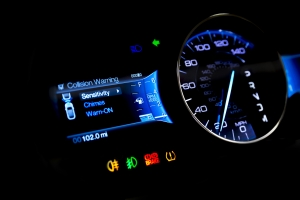
What does the TPMS dashboard light/warning indicate?
The light will illuminate when a tire is low, and should eventually go out after a tire has been inflated to its recommended pressure according to the vehicle’s door placard. After starting a vehicle, a TPMS icon will turn on for a few seconds, however, if it stays on, it indicates that one or more of the tires on the vehicle is at least 25% below the recommended pressure. If the light flashes for approximately one to two minutes, it indicates there is a malfunction in the TPMS system.
There are numerous situations that can cause a TPMS warning light to come on or flash. Some TPMS problems include:

What does TPMS stand for?
Tire Pressure Monitoring System
What if the tool fails to connect to WebVT?
IMPORTANT!
If the tool fails to connect to WebVT, ask your network administrator to check Wi-Fi router settings:
What is a TPMS activation or trigger tool?
A TPMS activation or trigger tool allows the user to activate or trigger the wireless tire pressure monitoring sensor mounted within a tire. For example, all TPMS sensors carry an internal battery that can drain while in storage. When a vehicle is manufactured in a plant, the TPMS sensors mounted within the tire are left in “sleep” mode when delivered to a workshop or dealer. Therefore, the TPMS activation tool is needed to “activate” or “wake up” TPMS sensors mounted within the tires.
ATEQ TPMS workshop activation tools: VT56, VT55, VT36, VT15
ATEQ TPMS DIY activation tools: VT36, VT30, VT15
What is the difference between a TPMS reset tool, TPMS activation or trigger tool, and TPMS decoding tool?
A TPMS reset tool can be used to reset or reprogram the OEM or Aftermarket TPMS sensor to the vehicle’s ECU whenever tires are replaced or changed from summer to winter tires, tire is replaced, tire rotation, etc.
ATEQ TPMS workshop reset tools: VT56, VT55, VT36, VT30
A TPMS activation or trigger tool allows the user to “wake up” or activate the sensors while in “sleep mode” or while inactivate.
ATEQ TPMS workshop activation tools: VT56, VT55, VT36, VT30, VT15
ATEQ TPMS DIY activation tools: VT36, VT30, VT15
ATEQ TPMS industrial activation tools: VT60S, DiagVT, VT520
A TPMS decoding tool can trigger or activate sensors, receive TPMS sensor information and send the TPMS sensor information to the vehicle’s ECU. The TPMS sensor information received by the TPMS decoding tool includes the pressure within the tire, the temperature of the TPMS sensor, the wheel rotating speed, the TPMS sensor unique ID, the battery status of the TPMS sensor, and more.
ATEQ TPMS workshop activation tools: VT56, VT36, VT15
ATEQ TPMS DIY activation tools: VT36
What you should know before contacting support
Before contacting support, have you updated your software recently? The number one reason for ATEQ TPMS tool issues is outdated software. Update your tool’s software and check to see if your issue(s) continue.
When changing from summer to winter wheels, using the COPY SET functionality, the VERIFY ERROR, PLEASE TRY AGAIN is displayed
If this happens in the beginning of the process:
If this happens during the validation process:
When I program a sensor, the tool displays the message WRONG FREQUENCY, CHANGE SENSOR.
The aftermarket sensor cannot be programmed in the frequency required for that vehicle (315 or 434 MHz). The user should check if the sensor is compatible with the vehicle selected.
When I program a single sensor the tool displays VERIFY ERROR, PLEASE TRY AGAIN.
When I trigger a sensor, it does not respond
When I trigger the sensor, the message REDUCE TIRE PRESSURE is displayed.
Some first generations of TPMS sensors (such as Beru or Pacific) need to be put under pressure in order to be activated. The correct procedure, when the sensor is fitted in the wheel, is to inflate the wheel according to the tire placard. The user should trigger the sensor, and slowly deflate the tire simultaneously. After a few seconds, the sensor will respond. Enter the correct tire pressure.
Where is my SD card located (VT56, VT55)?


Where to locate the tool’s serial number?
Not all ATEQ TPMS tools and equipment display a serial number. Please see the list of ATEQ TPMS tools below with a serial number location. Providing a serial number to tech support will expedite the waiting period.
VT56: The VT56 tool serial number is located on the back of the tool, it begins with B366.

VT55: The VT55 tool serial number is located on the back of the tool under the rubber boot. You must remove the rubber boot to locate your serial number. The serial number begins with B285.

VT36: The VT36 tool serial number is located on the back of the tool. The serial number begins with K360.

VT30: The VT30 tool serial number is located on the back of the tool, it begins with K300.

VT60/VT60S: The VT60 and VT60S tool serial number is located on the front of the tool. The serial number begins with B258.

VT520: The VT520 serial number is located on the front of the instrument. The serial number begins with C102.

DiagVT: The DiagVT serial number is located on the front of the tool. The serial number begins with B240.

TTD (Tire Tread Depth Gauge): The TTD serial number is located on the back of the tool. The serial number begins with B380.

Why can’t my current TPMS tool trigger, activate or reset some sensors?
If your TPMS tool cannot activate or reset a sensor, we recommend updating your TPMS tool to include the latest TPMS sensors. With a growing TPMS market, new TPMS sensors are new to the market every day. ATEQ engineers are hard at work to make sure all known TPMS sensors are compatible with ATEQ TPMS tools.
ATEQ upgradeable TPMS tools such as the VT56, VT55, VT36, VT30 and VT15 are always compatible with the latest TPMS sensors released to the market.
Why does my VT55/VT56 start flashing when I connect the OBDII module to a vehicle for the first time after updating my tool’s software?
There is new firmware available for the OBDII module, and the device is attempting to communicate with the vehicle and complete a firmware update at the same time. Simply power the tool off and then on again. Once the main menu is displayed, connect the OBDII module only to the device; leaving the other end disconnected from any vehicle. The OBDII module will be detected almost immediately by the tool and the firmware, and the update will begin. The update takes less than 60 seconds to complete. Once completed, disconnect the OBDII module and power the device off. The update is now complete.
Why does my workshop need a TPMS tool?
A TPMS tool is needed for the following:
ATEQ TPMS workshop tools: VT56, VT36, VT15
Why is my vehicle equipped with TPMS sensors?
The tire pressure monitoring system (TPMS) primary function is to make the driver aware of the state of tire pressure within the wheels. Under normal system operations, the TPMS system will alert the driver when one or more affected tires PSI reading falls below 25% of the placard. When the tire sensor indicates “low tire pressure”, it sends a radio frequency (RF) signal of 315 or 433 MHz to the ECU on the vehicle that determines if the pressure is below the threshold, which then will indicate a TPMS symbol or position-specific display, depending on the vehicle.
In 2000, after Firestone recalled more than 6.5 million vehicles due to tread separation, the NHTSA (National Highway Traffic Safety Administration) issued the first version of the TREAD Act which required Tire Pressure Warning Systems to be implemented on all vehicles sold in the United States by the year 2008 including all passenger vehicles and light trucks with GVWR of 10,000 lbs. and less.
Advantages of a TPMS system:
A TPMS equipped tire can display the TPMS sensor internal pressure and warns drivers when it reaches a low level by displaying a TPMS warning light.

Videos